
Introduction
Table of Contents
- Prerequisites for Installing AsterixDB
- Section 1: Single-Machine AsterixDB installation
- Section 2: Single-Machine AsterixDB installation (Advanced)
- Section 3: Installing AsterixDB on a Cluster of Multiple Machines
- Section 4: Managing the Lifecycle of an AsterixDB Instance
- Section 5: Frequently Asked Questions
This is a quickstart guide for getting AsterixDB running in a distributed environment. This guide also introduces the AsterixDB installer (nicknamed Managix) and describes how it can be used to create and manage an AsterixDB instance. By following the simple steps described in this guide, you will get a running instance of AsterixDB. You shall be able to use AsterixDB from its Web interface and manage its lifecycle using Managix. This document assumes that you are running some version of Linux or MacOS X.
Prerequisites for Installing AsterixDB [Back to TOC]
Prerequisite:
To know the version of Java installed on your system, execute the following:
$ java -version
If your version is at least 1.8.0_x, similar to the output shown below, you are good to proceed.
java version "1.8.0_60"
Java(TM) SE Runtime Environment (build 1.8.0_60-b27)
Java HotSpot(TM) 64-Bit Server VM (build 25.60-b23, mixed mode)
If you need to upgrade or install java, please follow Oracle’s instructions. The installation directory for
-
Linux would be at a path under /usr/lib/jvm/[jdk-version].
-
Mac would be /Library/Java/JavaVirtualMachines/[jdk-version]/Contents/Home.
The java installation directory is referred as JAVA_HOME. Since we upgraded/installed Java, we need to ensure JAVA_HOME points to the installation directory of JDK. Modify your ~/.bash_profile (or ~/.bashrc) and define JAVA_HOME accordingly. After the modification, execute the following:
$ java -version
If the version information you obtain does not show 1.8, you need to update the PATH variable. To do so, execute the following:
$ echo "PATH=$JAVA_HOME/bin:$PATH" >> ~/.bash_profile (or ~/.bashrc)
$ source ~/.bash_profile (or ~/.bashrc)
Section 1: Single-Machine AsterixDB installation [Back to TOC]
We assume a user called “Joe” with a home directory as /home/joe. On a Mac, the home directory for user Joe would be /Users/joe.
Configuring Environment
Ensure that JAVA_HOME variable is defined and points to the the java installation directory on your machine. To verify, execute the following:
$ echo $JAVA_HOME
If you do not see any output, JAVA_HOME is not defined. We need to add the following line to your profile located at /home/joe/.bash_profile or /home/joe/.bashrc, whichever you are using. If you do not have any of these files, create a ~/.bash_profile file.
export JAVA_HOME=<Path to Java installation directory>
After you have edited ~/.bash_profile (or ~/.bashrc), execute the following to make the changes effective in current shell:
$ source /home/joe/.bash_profile (or /home/joe/.bashrc)
Before proceeding, verify that JAVA_HOME is defined by executing the following:
$ echo $JAVA_HOME
Configuring SSH
If SSH is not enabled on your system, please follow the instruction below to enable/install it or else skip to the section Configuring Password-less SSH.
Enabling SSH on Mac
The Apple Mac OS X operating system has SSH installed by default but the SSH daemon is not enabled. This means you can’t login remotely or do remote copies until you enable it. To enable it, go to ‘System Preferences’. Under ‘Internet & Networking’ there is a ‘Sharing’ icon. Run that. In the list that appears, check the ‘Remote Login’ option. Also check the “All users” radio button for “Allow access for”. This starts the SSH daemon immediately and you can remotely login using your username. The ‘Sharing’ window shows at the bottom the name and IP address to use. You can also find this out using ‘whoami’ and ‘ifconfig’ from the Terminal application.
Enabling SSH on Linux
sudo apt-get install openssh-server
Assumming that you have enabled SSH on your system, let us proceed.
Configuring Password-less SSH
For our single-machine setup of AsterixDB, we need to configure password-less SSH access to localhost. We assume that you are on the machine where you want to install AsterixDB. To verify if you already have password-less SSH configured, execute the following:
$ ssh 127.0.0.1
If you get an output similar to one shown below, type “yes” and press enter.
The authenticity of host '127.0.0.1 (127.0.0.1)' can't be established.
RSA key fingerprint is aa:7b:51:90:74:39:c4:f6:28:a2:9d:47:c2:8d:33:31.
Are you sure you want to continue connecting (yes/no)?
If you are not prompted for a password, that is if you get an output similar to one shown below, it signifies that you already have password-less SSH configured.
$ ssh 127.0.0.1
Last login: Sat Mar 23 22:52:49 2013
[Important: Password-less SSH requires the use of a (public,private) key-pair. The key-pair is located as a pair of files under $HOME/.ssh directory. It is required that the (public,private) key-pair files have default names (id_rsa.pub, id_rsa) respectively. If you are using different names, please rename the files to use the default names]
Skip to the next section Configuring Managix.
You are here because you were prompted for a password. You need to configure password-less SSH. We shall generate a (public,private) key-pair as id_rsa.pub and id_rsa respectively. If $HOME/.ssh already contains a (public,private) key-pair, please ensure the files are renamed before proceeding. Follow the instructions below.
$ ssh-keygen -t rsa -P ""
Generating public/private rsa key pair.
Enter file in which to save the key (/home/joe/.ssh/id_rsa):
[Important: Please ensure that we use the default value, so simply press enter]
If a key already exists, you should get an output similar to what is shown below. Press ‘y’ to overwrite the existing key. It is required to use the default name. If you wish to not overwrite a pre-existing key, ensure that the pre-existing key is saved with a different name.
/home/joe/.ssh/id_rsa already exists.
Overwrite (y/n)?
You should see an output similar to one shown below:
The key fingerprint is:
4d:b0:30:14:45:cc:99:86:15:48:17:0b:39:a0:05:ca joe@joe-machine
The key's randomart image is:
+--[ RSA 2048]----+
|  ..o+B@O=       |
|.. o  ==*+       |
|.E.    oo .      |
|         o       |
|        S .      |
|                 |
|                 |
|                 |
|                 |
+-----------------+
Note: for Linux users, you may not get an image representation of the key, but this is not an error. Next, execute the following:
$ cat $HOME/.ssh/id_rsa.pub >> $HOME/.ssh/authorized_keys
$ chmod 700  $HOME/.ssh/authorized_keys
We shall now retry SSH without password.
$ ssh 127.0.0.1
You may see an output similar to one shown below:
The authenticity of host '127.0.0.1 (127.0.0.1)' can't be established.
RSA key fingerprint is aa:7b:51:90:74:39:c4:f6:28:a2:9d:47:c2:8d:33:31.
Are you sure you want to continue connecting (yes/no)?
Type ‘yes’ and press the enter key. You should see an output similar to one shown below:
Warning: Permanently added '127.0.0.1' (RSA) to the list of known hosts.
Last login: Thu Mar 28 12:27:10 2013
You should now be able to log in without being prompted for a password or a response.
ssh 127.0.0.1
Last login: Sat Mar 23 22:54:40 2013
Execute ‘exit’ to close the session.
$ exit
logout
Connection to 127.0.0.1 closed.
Configuring Managix
You will need the AsterixDB installer (a.k.a. Managix). Download the Standalone Cluster installer from here; this includes the bits for Managix as well as AsterixDB.
We will refer to the directory containing the extracted files as MANAGIX_HOME and we assume that MANAGIX_HOME/bin is on your PATH.
To be able to create an AsterixDB instance and manage its lifecycle, Managix requires you to configure a set of configuration files namely:
- conf/managix-conf.xml: A configuration XML file that contains configuration settings for Managix.
- A configuration XML file that describes the nodes in the cluster, e.g., clusters/local/local.xml.
Since we intend to run AsterixDB on a single node, Managix can auto-configure itself and populate the above configuration files. To auto-configure Managix, execute the following in the MANAGIX_HOME directory:
/home/joe/asterix-mgmt> $ managix configure
Let us do a sample run to validate the set of configuration files auto-generated by Managix.
/home/joe/asterix-mgmt> $ managix validate
  INFO: Environment [OK]
  INFO: Managix Configuration [OK]

/home/joe/asterix-mgmt> $ managix validate -c clusters/local/local.xml
  INFO: Environment [OK]
  INFO: Cluster configuration [OK]
Creating an AsterixDB instance
Now that we have configured Managix, we shall next create an AsterixDB instance. An AsterixDB instance is identified by a unique name and is created using the create command. The usage description for the create command can be obtained by executing the following:
$ managix help -cmd create
Creates an AsterixDB instance with a specified name. Post creation, the instance is in ACTIVE state,
indicating its availability for executing statements/queries.
Usage arguments/options:
-n Name of the AsterixDB instance.
-c Path to the cluster configuration file
We shall now use the create command to create an AsterixDB instance by the name “my_asterix”. In doing so, we shall use the cluster configuration file that was auto-generated by Managix.
$ managix create -n my_asterix -c clusters/local/local.xml
A sample output of the above command is shown below:
INFO: Name:my_asterix
Created:Thu Mar 07 11:14:13 PST 2013
Web-Url:http://127.0.0.1:19001
State:ACTIVE
The third line above shows the web-url http://127.0.0.1:19001 for an AsterixDB’s web interface. The AsterixDB instance is in the ‘ACTIVE’ state, indicating that you may access the web interface by navigating to the web url.
Type in the following “Hello World” query in the box:
let $message := 'Hello World!'
return $message
Press the “Run” button. If the query result shows on the output box, then Congratulations! You have successfully created an AsterixDB instance!
Section 2: Single-Machine AsterixDB installation (Advanced) [Back to TOC]
We assume that you have successfully completed the single-machine AsterixDB installation by following the instructions above in section AsterixDB installation. In this section, we shall cover advanced topics related to AsterixDB configuration. Before we proceed, it is imperative to go through some preliminary concepts related to AsterixDB runtime.
AsterixDB Runtime
An AsterixDB runtime comprises of a ‘‘master node’’ and a set of ‘‘worker nodes’’, each identified by a unique id. The master node runs a ‘‘Cluster Controller’’ service (a.k.a. ‘‘CC’’), while each worker node runs a ‘‘Node Controller’’ service (a.k.a. ‘‘NC’’). Please note that a node in an AsterixDB cluster is a logical concept in the sense that multiple nodes may map to a single physical machine, which is the case for a single-machine AsterixDB installation. This association or mapping between an AsterixDB node and a physical machine is captured in a cluster configuration XML file. In addition, the XML file contains properties and parameters associated with each node.
AsterixDB Runtime Configuration
As observed earlier, Managix can auto-configure itself for a single-machine setup. As part of auto-configuration, Managix generated the cluster XML file. Let us understand the components of the generated cluster XML file. If you have configured Managix (via the configure command), you can find a similar cluster XML file as $MANAGIX_HOME/clusters/local/local.xml. The following is a sample XML file generated on a Ubuntu (Linux) setup:
<?xml version="1.0" encoding="UTF-8" standalone="yes"?>
<cluster xmlns="cluster">
    <name>local</name>
    <java_home>/usr/lib/jvm/jdk1.8.0</java_home>
    <log_dir>/home/joe/asterix-mgmt/clusters/local/working_dir/logs</log_dir>
    <txn_log_dir>/home/joe/asterix-mgmt/clusters/local/working_dir/logs</txn_log_dir>
    <iodevices>/home/joe/asterix-mgmt/clusters/local/working_dir</iodevices>
    <store>storage</store>
    <working_dir>
        <dir>/home/joe/asterix-mgmt/clusters/local/working_dir</dir>
        <NFS>true</NFS>
    </working_dir>
    <master_node>
        <id>master</id>
        <client_ip>127.0.0.1</client_ip>
        <cluster_ip>127.0.0.1</cluster_ip>
        <client_port>1098</client_port>
        <cluster_port>1099</cluster_port>
        <http_port>8888</http_port>
    </master_node>
    <node>
        <id>node1</id>
        <cluster_ip>127.0.0.1</cluster_ip>
    </node>
</cluster>
We shall next explain the components of the cluster configuration XML file.
(1) Defining nodes in AsterixDB runtime
The single-machine AsterixDB instance configuration that is auto-generated by Managix (using the configure command) involves a master node (CC) and a worker node (NC). Each node is assigned a unique id and provided with an ip address (called ‘‘cluster_ip’’) that maps a node to a physical machine. The following snippet from the above XML file captures the master/worker nodes in our AsterixDB installation.
<master_node>
    <id>master</id>
    <client_ip>127.0.0.1</client_ip>
    <cluster_ip>127.0.0.1</cluster_ip>
    <client_port>1098</client_port>
    <cluster_port>1099</cluster_port>
    <http_port>8888</http_port>
</master_node>
<node>
    <id>node1</id>
    <cluster_ip>127.0.0.1</cluster_ip>
</node>
The following is a description of the different elements in the cluster configuration xml file.
| Property | Description |
| id | A unique id for a node. |
| cluster_ip | IP address of the machine to which a node maps to. This address is used for all internal communication between the nodes. |
| client_ip | Provided for the master node. This IP should be reachable from clients that want to connect with AsterixDB via its web interface. |
| client_port | Provided for the master node. This is the port at which the Cluster Controller (CC) service listens for connections from clients. |
| cluster_port | Provided for the master node. This is the port used by the Cluster Controller (CC) service to listen for connections from Node Controllers (NCs). |
| http-port | Provided for the master node. This is the http port used by the Cluster Controller (CC) service. |
(2) Properties associated with a worker node (NC) in AsterixDB
The following is a list of properties associated with each worker node in an AsterixDB configuration.
| Property | Description |
| java_home | Java installation directory at each node. |
| log_dir | A directory where the worker node JVM may write logs. |
| txn_log_dir | A directory where the worker node writes transaction logs. |
| iodevices | Comma separated list of IO Device mount points. |
| store | A data directory (under each iodevice) that AsterixDB uses to store data belonging to dataset(s). |
All the above properties can be defined at the global level or a local level. In the former case, these properties apply to all the nodes in an AsterixDB configuration. In the latter case, these properties apply only to the node(s) under which they are defined. A property defined at the local level overrides the definition at the global level.
(3) Working directory of an AsterixDB instance
Next we explain the following setting in the file $MANAGIX_HOME/clusters/local/local.xml.
<working_dir>
    <dir>/Users/joe/asterix-mgmt/clusters/local/working_dir</dir>
    <NFS>true</NFS>
</working_dir>
Managix associates a working directory with an AsterixDB instance and uses this directory for transferring binaries to each node. If there is a directory that is readable by each node, Managix can use it to place binaries that can be accessed and used by all the nodes in the AsterixDB set up. A network file system (NFS) provides such a functionality for a cluster of physical machines so that a path on NFS is accessible from each machine in the cluster. In the single-machine set up described above, all nodes correspond to a single physical machine. Each path on the local file system is accessible to all the nodes in the AsterixDB setup and the boolean value for NFS above is thus set to true.
Managix Configuration
Managix allows creation and management of multiple AsterixDB instances and uses Zookeeper as its back-end database to keep track of information related to each instance. We need to provide a set of one or more hosts that Managix can use to run a Zookeeper instance. Zookeeper runs as a daemon process on each of the specified hosts. At each host, Zookeeper stores data under the Zookeeper home directory specified as part of the configuration. The following is an example configuration $MANAGIX_HOME/conf/managix-conf.xml that has Zookeeper running on the localhost (127.0.0.1) :
<?xml version="1.0" encoding="UTF-8" standalone="yes"?>
<configuration xmlns="installer">
    <zookeeper>
        <homeDir>/home/joe/asterix/.installer/zookeeper</homeDir>
        <clientPort>2900</clientPort>
        <servers>
            <server>127.0.0.1</server>
        </servers>
    </zookeeper>
</configuration>
It is possible to have a single host for Zookeeper. A larger number of hosts would use Zookeeper’s replication and fault-tolerance feature such that a failure of a host running Zookeeper would not result in loss of information about existing AsterixDB instances.
Section 3: Installing AsterixDB on a Cluster of Multiple Machines[Back to TOC]
We assume that you have read the two sections above on single-machine AsterixDB setup. Next we explain how to install AsterixDB in a cluster of multiple machines. As an example, we assume we want to setup AsterixDB on a cluster of three machines, in which we use one machine (called machine A) as the master node and two other machines (called machine B and machine C) as the worker nodes, as shown in the following diagram:
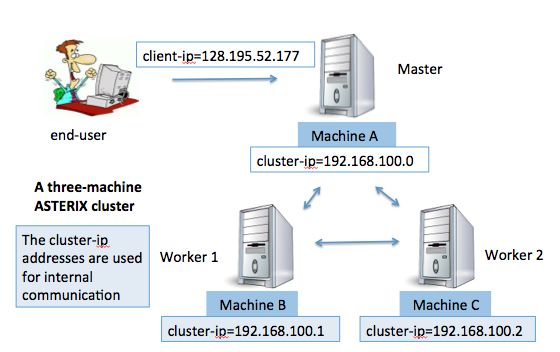
Notice that each machine has a ‘‘cluster_ip’’ address, which is used by these machines for their intra-cluster communication. Meanwhile, the master machine also has a ‘‘client_ip’’ address, using which an end-user outside the cluster can communicate with this machine. The reason we differentiate between these two types of IP addresses is that we can have a cluster of machines using a private network. In this case they have internal ip addresses that cannot be used outside the network. In the case all the machines are on a public network, the “client_ip” and “cluster_ip” of the master machine can share the same address.
Next we describe how to set up AsterixDB in this cluster, assuming no Managix has been installed on these machines.
Step (1): Configure SSH
The steps of setting up SSH are similar to those in the single-machine setup case. We assume we have a common user account called “joe” on each machine in the cluster.
On the master machine, do the following:
machineA> ssh 127.0.0.1
If you get an output similar to one shown below, type “yes” and press enter.
The authenticity of host '127.0.0.1 (127.0.0.1)' can't be established.
RSA key fingerprint is aa:7b:51:90:74:39:c4:f6:28:a2:9d:47:c2:8d:33:31.
Are you sure you want to continue connecting (yes/no)?
If you are not prompted for a password, that is if you get an output similar to one shown below, it signifies that you already have password-less SSH configured.
$ ssh 127.0.0.1
Last login: Sat Mar 23 22:52:49 2013
[Important: Password-less SSH requires the use of a (public,private) key-pair. The key-pair is located as a pair of files under $HOME/.ssh directory. It is required that the (public,private) key-pair files have default names (id_rsa.pub, id_rsa) respectively. If you are using different names, please rename the files to use the default names]
If you are prompted for a password, execute the following
machineA> ssh-keygen -t rsa -P ""
machineA> cat $HOME/.ssh/id_rsa.pub >> $HOME/.ssh/authorized_keys
machineA> chmod 700  $HOME/.ssh/authorized_keys
If $HOME is not on the NFS, copy the id_rsa.pub to the directory ~/.ssh (login with the same account) on each machine, and then do the following on each machine. (Notice that this step is not needed if the folder “.ssh” is on the NFS and can be accessed by all the nodes.)
cd ~/.ssh
cat id_rsa.pub >> authorized_keys
chmod 700  $HOME/.ssh/authorized_keys
Then run the following step again and type “yes” if prompted:
machineA> ssh 127.0.0.1
Step (2): Define the AsterixDB cluster
We first log into the master machine as the user “joe”. On this machine, download the Standalone Cluster installer from here (save as above), then do the following steps similar to the single-machine case described above:
machineA> cd ~
machineA> mkdir asterix-mgmt
machineA> cd asterix-mgmt
machineA> unzip  <path to the Managix zip bundle>
Note that it is recommended that MANAGIX_HOME is not located on a network file system (NFS). Managix creates artifacts/logs that are not required to be shared. Any overhead associated with creating artifacts/logs on the NFS should be avoided.
We also need an AsterixDB configuration XML file for the cluster. We give the name to the cluster, say, “rainbow”. We create a folder for the configuration of this cluster:
machineA> mkdir asterix-mgmt/rainbow_cluster
For this cluster we create a configuration file $MANAGIX_HOME/rainbow_cluster/rainbow.xml. The following is a sample file with explanation of the properties:
<cluster xmlns="cluster">

  <!-- Name of the cluster -->
  <name>rainbow</name>

  <!-- username, which should be valid for all the three machines -->
  <username>joe</username>

  <!-- The working directory of Managix. It is recommended for the working
       directory to be on a network file system (NFS) that can accessed by
       all machines.
       Managix creates the directory if it it doesn't exist. -->
  <working_dir>
    <dir>/home/joe/managix-workingDir</dir>
    <NFS>true</NFS>
  </working_dir>

  <!-- Directory for Asterix to store worker logs information for each machine.
       Needs to be on the local file system of each machine.
       Managix creates the directory if it doesn't exist.
       This property can be overriden for a node by redefining at the node level. -->
  <log_dir>/mnt/joe/logs</log_dir>

  <!-- Directory for Asterix to store transaction log information for each machine.
       Needs to be on the local file system of each machine.
       Managix creates the directory if it doesn't exist.
       This property can be overriden for a node by redefining at the node level. -->
  <txn_log_dir>/mnt/joe/txn_logs</txn_log_dir>

  <!-- Mount point of an iodevice. Use a comma separated list for a machine that
       has multiple iodevices (disks).
       This property can be overriden for a node by redefining at the node level. -->
  <iodevices>/mnt/joe</iodevices>

  <!-- Path on each iodevice where Asterix will store its data -->
  <store>storage</store>

  <!-- Java home for each machine -->
  <java_home>/usr/lib/jvm/jdk1.8.0</java_home>

  <!-- IP addresses of the master machine A -->
  <master_node>
    <id>master</id>
    <client_ip>128.195.52.177</client_ip>
    <cluster_ip>192.168.100.0</cluster_ip>
    <client_port>1098</client_port>
    <cluster_port>1099</cluster_port>
    <http_port>8888</http_port>
  </master_node>

  <!-- IP address(es) of machine B -->
  <node>
    <id>nodeB</id>
    <cluster_ip>192.168.100.1</cluster_ip>
  </node>

   <!-- IP address(es) of machine C -->
  <node>
    <id>nodeC</id>
    <cluster_ip>192.168.100.2</cluster_ip>
  </node>
</cluster>
As stated before, each of the above properties can be defined at the cluster level, in which case it applies to all the nodes in the system. Each property can also be defined at a node level.
Once we have formed the cluster XML file, we can validate the configuration by doing the following:
managix validate -c rainbow_cluster/rainbow.xml
This will verify the contents of the file, and also attempt to ssh to each node in the cluster to ensure that password-less SSH is configured correctly. You may see output like
The authenticity of host '192.168.100.1 (192.168.100.1)' can't be established.
RSA key fingerprint is 89:80:31:1f:be:51:16:d7:2b:f5:e0:b3:2c:bd:83:94.
Are you sure you want to continue connecting (yes/no)?
and this output may be repeated for each node in the cluster. Answer “yes” each time.
If the final output contains the following lines (possibly separated by the RSA prompts mentione above):
INFO: Environment [OK]
INFO: Cluster configuration [OK]
it means that the XML configuration file is correct!
Step (3): Configuring Managix
Managix uses a configuration XML file at $MANAGIX_HOME/conf/managix-conf.xml to configure its own properties, such as its Zookeeper service. We can use the configure command to auto-generate this configuration file:
machineA> managix configure
We use the validate command to validate the Managix configuration. To do so, execute the following.
machineA> managix validate
INFO: Environment [OK]
INFO: Managix Configuration [OK]
Note that the configure command also generates a cluster configuration XML file at $MANAGIX_HOME/clusters/local/local.xml. This file is not needed in the case of a cluster of machines.
Step (4): Creating an AsterixDB instance
Now that we have configured Managix, we shall next create an AsterixDB instance, which is identified by a unique name and is created using the create command. The usage description for the create command can be obtained by executing the following:
machineA> managix help -cmd create

Creates an AsterixDB instance with a specified name. Post creation, the instance is in ACTIVE state,
indicating its availability for executing statements/queries.
Usage arguments/options:
-n Name of the AsterixDB instance.
-c Path to the cluster configuration file
We shall now use the create command to create an AsterixDB instance called “rainbow_asterix”. In doing so, we shall use the cluster configuration file that was auto-generated by Managix.
machineA> managix create -n rainbow_asterix -c clusters/rainbow.xml
If the response message does not have warning, then Congratulations! You have successfully installed AsterixDB on this cluster of machines!
Please refer to the section Managing the Lifecycle of an AsterixDB Instance for a detailed description on the set of available commands/operations that let you manage the lifecycle of an AsterixDB instance. Note that the output of the commands varies with the cluster definition and may not apply to the cluster specification you built above.
Section 4: Managing the Lifecycle of an AsterixDB Instance [Back to TOC]
Now that we have an AsterixDB instance running, let us use Managix to manage the instance’s lifecycle. Managix provides the following set of commands/operations:
Managix Commands
| Command | Description |
| create | Creates a new asterix instance. |
| describe | Describes an existing asterix instance. |
| stop | Stops an asterix instance that is in the ACTIVE state. |
| start | Starts an AsterixDB instance. |
| backup | Creates a backup for an existing AsterixDB instance. |
| restore | Restores an AsterixDB instance. |
| delete | Deletes an AsterixDB instance. |
| validate | Validates the installer/cluster configuration. |
| configure | Auto generates a configuration for an AsterixDB instance. |
| log | Produces a zip archive containing log files from each node in an AsterixDB instance. |
| shutdown | Shuts down the installer service. |
You may obtain the above listing by simply executing ‘managix’ :
$ managix
We already talked about create and validate commands. We shall next explain the rest of the commands listed above. We also provide sample output messages of these commands assuming we are running an AsterixDB instance on a single machine.
Describe Command
The describe command provides information about an AsterixDB instance. The usage can be looked up by executing the following:
$ managix help -cmd describe

Provides information about an AsterixDB instance.
The following options are available:
[-n]      Name of the AsterixDB instance.
[-admin]  Provides a detailed description
The brackets indicate optional flags.
The output of the describe command when used without the admin flag contains minimal information and is similar to the output of the create command. Let us try running the describe command in “admin” mode.
$ managix describe -n my_asterix -admin
INFO: Name:my_asterix
Created:Thu Mar 07 19:07:00 PST 2013
Web-Url:http://127.0.0.1:19001
State:ACTIVE
Master node:master:127.0.0.1
node1:127.0.0.1

Asterix version:0.0.5
Asterix Configuration
output_dir = /tmp/asterix_output/
Metadata Node:node1
Processes
NC at 127.0.0.1 [ 22195 ]
CC at 127.0.0.1 [ 22161 ]

Asterix Configuration
    nc.java.opts                             :-Xmx1024m
    cc.java.opts                             :-Xmx1024m
    storage.buffercache.pagesize             :32768
    storage.buffercache.size                 :33554432
    storage.buffercache.maxopenfiles         :214748364
    storage.memorycomponent.pagesize         :32768
    storage.memorycomponent.numpages         :1024
    storage.memorycomponent.globalbudget     :536870192
    storage.lsm.mergethreshold               :3
    storage.lsm.bloomfilter.falsepositiverate:0.01
    txn.log.buffer.numpages                  :8
    txn.log.buffer.pagesize                  :131072
    txn.log.partitionsize                    :2147483648
    txn.log.disksectorsize                   :4096
    txn.log.groupcommitinterval              :1
    txn.log.checkpoint.lsnthreshold          :67108864
    txn.log.checkpoint.pollfrequency         :120
    txn.log.checkpoint.history               :0
    txn.lock.escalationthreshold             :1000
    txn.lock.shrinktimer                     :5000
    txn.lock.timeout.waitthreshold           :60000
    txn.lock.timeout.sweepthreshold          :10000
    compiler.sortmemory                      :33554432
    compiler.joinmemory                      :33554432
    compiler.framesize                       :32768
    web.port                                 :19001
    api.port                                 :19002
    log.level                                :INFO
As seen above, the instance ‘my_asterix’ is configured such that all processes running at the localhost (127.0.0.1). The process id for each process (JVM) is shown next to it.
Stop Command
The stop command can be used for shutting down an AsterixDB instance. After that, the instance is unavailable for executing queries. The usage can be looked up by executing the following.
$ managix help -cmd stop

Shuts an AsterixDB instance that is in ACTIVE state. After executing the stop command, the AsterixDB instance transits
to the INACTIVE state, indicating that it is no longer available for executing queries.

Available arguments/options
-n name of the AsterixDB instance.
To stop the AsterixDB instance.
$ managix stop -n my_asterix
  INFO: Stopped AsterixDB instance: my_asterix

$ managix describe -n my_asterix
  INFO: Name: my_asterix
  Created:Thu Mar 07 19:07:00 PST 2013
  Web-Url:http://127.0.0.1:19001
  State:INACTIVE (Fri Mar 08 09:49:00 PST 2013)
Start Command
The start command starts an AsterixDB instance that is in the INACTIVE state. The usage can be looked up by executing the following:
 $ managix help -cmd start

 Starts an AsterixDB instance that is in INACTIVE state. After executing the start command, the AsterixDB instance transits to the ACTIVE state, indicating that it is now available for executing statements/queries.

 Available arguments/options
 -n name of the AsterixDB instance.
Let us now start the AsterixDB instance.
 $ managix start -n my_asterix
   INFO: Name:my_asterix
   Created:Thu Mar 07 19:07:00 PST 2013
   Web-Url:http://127.0.0.1:19001
   State:ACTIVE (Fri Mar 08 09:49:00 PST 2013)
Backup Command
The backup command allows you to take a backup of the data stored with an AsterixDB instance. The backup can be taken on the local file system or on an HDFS instance. In either case, the snapshots are stored under a backup directory. You need to make sure the backup directory has appropriate read/write permissions. Configuring settings for backup can be found inside the Managix’s configuration file located at $MANAGIX_HOME/conf/managix-conf.xml.
Configuring backup on the local file system
We need to provide a path to a backup directory on the local file system. The backup directory can be configured be editing the Managix configuration XML, found at $MANAGIX_HOME/conf/managix-conf.xml.
<backup>
  <backupDir>Provide path to the backup directory here</backupDir>
</backup>
Prior to taking a backup of an AsterixDB instance, it is required for the instance to be in the INACTIVE state. We do so by using the stop command, as shown below:
$ managix stop -n my_asterix
  INFO: Stopped AsterixDB instance: my_asterix
We can now take the backup by executing the following:
$ managix backup -n my_asterix
  INFO: my_asterix backed up 0_Fri Mar 08 16:16:34 PST 2013 (LOCAL)
Configuring backup on an HDFS instance
To configure a backup to be taken on an HDFS instance, we need to provide required information about the running HDFS instance. This information includes the HDFS version and the HDFS url. Simply edit the Managix configuration file and provide the required information.
<backup>
   <backupDir>Provide path to the backup directory here</backupDir>
   <hdfs>
       <version>0.20.2</version>
       <url></url>
   </hdfs>
</backup>
A sample output when a backup is taken on an HDFS is shown below:
$ managix backup -n my_asterix
  INFO: my_asterix backed up 1_Fri Mar 08 17:10:38 PST 2013 (HDFS)
Each time we take a backup, we are provided with a unique id (a monotonically increasing value starting with 0). This id is required when we need to restore from a previously taken backup. Information about all available backup snapshots can be obtained by using the describe command in the admin mode, as shown below:
$ managix describe -n my_asterix -admin
INFO: Name:my_asterix
Created:Fri Mar 08 15:11:12 PST 2013
Web-Url:http://127.0.0.1:19001
State:INACTIVE (Fri Mar 08 16:14:20 PST 2013)
Master node:master:127.0.0.1
node1:127.0.0.1

Backup:0 created at Fri Mar 08 16:16:34 PST 2013 (LOCAL)
Backup:1 created at Fri Mar 08 17:10:38 PST 2013 (HDFS)

Asterix version:0.0.5
Asterix Configuration
Metadata Node:node1
Processes
The above output shows the available backup identified by it’s id (0). We shall next describe the method for restoring an AsterixDB instance from a backup snapshot.
Restore Command
The restore command allows you to restore an AsterixDB instance’s data from a previously taken backup. The usage description can be obtained as follows:
$ managix help -cmd restore

Restores an AsterixDB instance's data from a previously taken backup.
Available arguments/options

-n name of the AsterixDB instance
-b id of the backup snapshot
The following command restores our AsterixDB instance from the backup snapshot identified by the id (0). Prior to restoring an instance from a backup, it is required that the instance is in the INACTIVE state.
$ managix restore -n my_asterix -b 0
INFO: AsterixDB instance: my_asterix has been restored from backup
You can start the AsterixDB instance by using the start command.
Log Command
The log command allows you to collect the log files coresponding to each node of an AsterixDB instance into a zip archive. The zip archive is produced on the local file system of the machine running managix.
$ managix help -cmd log

Creates a zip archive containing log files corresponding to each worker node (NC) and the master (CC) for an AsterixDB instance

Available arguments/options
-n name of the AsterixDB instance.
-d destination directory for producing the zip archive. Defaults to $MANAGIX_HOME/logdump.
The following is an example showing the use of the log command.
$ managix log -n my_asterix -d  /Users/joe/logdump
INFO: Log zip archive created at /Users/joe/logdump/log_Thu_Jun_06_00:53:51_PDT_2013.zip
Delete Command
As the name suggests, the delete command permanently removes an AsterixDB instance by cleaning up all associated data/artifacts. The usage can be looked up by executing the following:
$ managix help -cmd delete
Permanently deletes an AsterixDB instance. The instance must be in the INACTIVE state.

Available arguments/options
-n name of the AsterixDB instance.


$ managix delete -n my_asterix
 INFO: AsterixDB instance my_asterix deleted.
Shutdown Command
Managix uses Zookeeper service for storing all information about created AsterixDB instances. The Zookeeper service runs in the background and can be shut down using the shutdown command.
$ managix shutdown
Help Command
The help command provides a usage description of a Managix command.
$ managix help -cmd <command name>
As an example, for looking up the help for the configure command, execute the following
$ managix help -cmd configure

Auto-generates the AsterixDB installer configruation settings and AsterixDB cluster
configuration settings for a single node setup.
Section 5: Frequently Asked Questions [Back to TOC]
Question
What happens if a machine acting as a node in the Asterix cluster becomes unreachable for some reason (network partition/machine failure) ?
Answer
When a node leaves the Asterix cluster, the AsterixDB instance transits to an ‘UNUSABLE’ state, indicating that it is no longer available for serving queries. To know which set of node(s) left the cluster, run the describe command with -admin flag.
$ $MANAGIX_HOME/bin/managix describe -n <name of the AsterixDB instance>-admin
Above command will show the state of AsterixDB instance and list the set of nodes that have left the cluster.
The failed node must be brought back to re-join the cluster. Once done, you may bring back the instance to an ‘ACTIVE’ state by executing the following sequence.
1) Get rid of the Asterix processes running on the nodes in the cluster:-
managix stop -n my_asterix
The processes associated with the instance are terminated and the instance moves to the INACTIVE state.
2) Start the AsterixDB instance using the start command.
managix start -n <name of your AsterixDB instance>
Answer
Managix will create a path if it is not existing. It does so using the user account mentioned in the cluster configuration xml. Please ensure that the user account has appropriate permissions for creating the missing paths.
Answer
It is recommended that MANAGIX_HOME is not on the NFS. Managix produces artifacts/logs on disk which are not required to be shared. As such an overhead in creating the artifacts/logs on the NFS should be avoided.
Question
How do we change the underlying code (apply a code patch) for an ‘active’ asterix instance?
Answer
At times, end-user (particularly asterix developer) may run into the need to altering the underlying code that is being run by an asterix instance. In the current version of managix, this can be achieved as follows:-
Assume that you have an ‘active’ instance by the name a1 that is running version v1 of asterix. You have a revised version of asterix - v2 that fixes some bug(s).
To upgrade asterix from v1 to v2:-
step 1) managix stop -n a1
step 2) managix shutdown
step 3) copy asterix-server zip (version v2) to asterix/
step 4) managix start -n a1
a1 now is running on version v2.
Limitations:-
a) Obviously this wont work in a situation where v2 has made a change that is incompatible with earlier version, such altering schema.
b) A change in asterix zip applies to all existing instances (after a restart) and subsequent instances that user creates.